1. Getting Started with the Platform:
(1) Login to the system
Method 1, visit bb.bfsu.edu.cn, click on the Blackboard on-campus platform (see Figure 19-1), and log in by entering your digital Northwestern username and password;

(Figure 19-1)
Method 2: Go to www.bfsu.edu.cn and click "Online Teaching" on the right side of the webpage (see Figure 19-2) to enter bb.bfsu.edu.cn, and log in in the same way as method 1;

(Figure 19-2)
Third, log in to Digital North and log in from "Blackboard" in the app (see Figure 19-3).

(Figure 19-3)
(2) Revision of personal information
Enter the homepage of BB platform, select "Personal Information" in the "Tools" column, click on "Edit Personal Information" and follow the prompts to make edits.
(3) Customise your personal homepage interface
Click the "Personalize Page" button on the upper right corner of "My Home" to personalize the page colour. Users can adjust the relative positions of modules by dragging them according to their personal preferences and needs; clicking on the up and down arrows in the upper right corner opens a window for reordering and adjusting the relative positions of modules.
2. Building the curriculum
On the course page, the upper left-hand half is the course menu, the navigation bar for the course; the lower left-hand half is the control panel, the area where the instructor manages the course, users, and student grades. Clicking on each course menu presents the corresponding specific information and resources in the content display area on the right (see Figure 19-4).

(Figure 19-4)
The "content display area" is a specific display of the content of the "course menu". In the "content area", you can add lecture notes, documents, assignments, audio and video, and other types of teaching courseware, course materials (audio files are recommended to be in mp3 format, video files are recommended to be in mp4 format, other formats may not be compatible). The uploaded audio and video files should not be more than 200 M. If you don't use VPN for direct access from outside the university, the uploaded files should be less than 25 M. If you use VPN from outside the university or within the university, there is no limitation in the system.)
(1) Adding teaching page settings
Log in to the system and in My Courses, select the course you want to add content to and click on it;
Make sure that "Edit Mode" in the upper right corner of the page is "On";
Select the coloured shell shape to the left of the edit mode and choose a colour theme for your course from the drop down menu;
Adding a content area menu to a course: There are various types of menus in the Blackboard platform, including a "Content Area Menu" if the teacher uploads course resources or posts assignments, tests, etc., and a "Tools Link" if the teacher uses notifications, discussion boards, contacts, and other communication and interaction tools (see Figure 19-5). Tool Links" (see Figure 19-5). Mouse over the course page menu bar in the upper left corner of the "+" button, select "content area" or "tool links"; add the name, check the " Available to users", submit.

(Figure 19-5)
(2) Adding teaching content
In the "Teaching Resources" menu of the course, you can add teaching courseware, teaching materials and other course content. You can add "Projects" to publish teaching content, and "Content Folders" to organise course content and plan chapters.
Add "Project": Firstly, click the menu in the menu bar that you want to add a project; then, click "Create Content" in the "Content Area" on the right side to see the drop-down menu, click "Project", enter the name and content of the project, and then you can publish the content. Click "Project", enter the project name and content, and then submit it to publish the teaching content.
Add "Content Folder": First, click the menu of the item you want to add in the menu bar; then, click "Create Content" in the "Content Area" on the right side and the drop-down menu will appear, click "Content Folder", enter the name and content of the content folder, and submit it to publish the content (see Figure 19-6). Click "Content Folder", enter the name and content of the content folder, and submit it to publish the teaching content (see Figure 19-6).

(Figure 19-6)
(3) Setting and marking homework
Assignments: Click on the menu you want to place the assignment menu, such as "Assignments assignments", place the mouse on the right side of the "content area" of the "mapping" on the emergence of the drop-down menu, click on "Assignments" to create assignments, add the name of the assignment, content and full marks, submit (see Figure 19-7); after successful creation, click on the name of the assignment can be previewed.

(Figure 19-7)
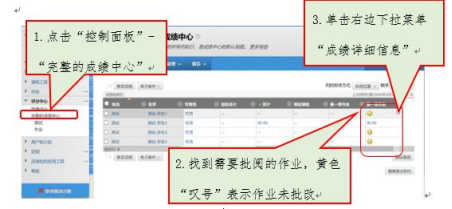
Review assignments: click the menu "Control Panel", select "Grade Centre", click "Full Grade Centre" to enter the interface (see Figure 19-8); select the students who need to be graded. Select the drop-down menu to the right of the assignment, enter the "Grade Details" interface, click on the "View Attempts" button to view the assignment (see Figure 19-9); after viewing the completion of the right side of the viewing page, you can instantly enter grades and feedback information (see Figure 19-10) Click "Submit".
(Figure 19-8)

(Figure 19-9)

(Figure 19-10)
(4) Creation of a group
To access the course, select "Control Panel" - "Users and Groups" - "Groups", select "Manual Enrolment" in the "Create" drop-down menu. "Groups" and select "Manual Enrolment" from the "Create" drop-down menu;
In the new window, enter the group name and group description, set the group availability to "Yes", set the availability of tools in the group, click "Add User", select the members of the group, and submit to complete the creation.
3. Teacher-student exchange
(1) Publication of notices
Click "Announcements" in the left menu bar to enter the announcements page, and then click "Create Announcement" in the "Content Display Area" on the right to enter the announcements editing page, enter the subject and content, and then click "Submit". Enter the subject and content, and click "Submit".
(2) Forum discussions
Create a forum: Click "Discussion" on the left menu bar, click "Create Forum" in the "Content Area" on the right, add the name and content of the new forum and click "Submit". Submit;
Create a topic: Click the forum name, enter the forum, click "Create a topic", enter the subject and click submit;
Once created, click on the topic title to display the details.